Thursday, 30 October 2014

Welcome to This Blog


Hello and Welcome to this blog!


 My name is Amanda Shachnaey, I am a second year Media Make-up student, part of the course we study is based in special effects and prosthetic make-up. 

This Blog will allow you to see the process behind a complete facial prosthetic make up, I say facial as we will be covering only these areas, but in order to create a full body prosthesis, the same or similar techniques are carried out, the process is a long laborious one. 

If I was working in film or T.V. Creating a creature for something for example like; Star-Trek or Dr Who? Then there would be a team creating, each member of that team would have a different job and in reality, you would rarely be applying your finished design, 

The reason I wanted to highlight this process is purely for those who enjoy and find this process an inspiration it, then dispels any unrealistic expectations that it is all on you, it is a lot of work, time consuming and personally I feel it must be the very nature of you, eating, sleeping and breathing this kind of stuff really helps. 

So now that I have explained the facts here are the basics:

As our task we were asked to choose from seven different titles
 
Ancient One
Demonic Nightmare
Strange Beauty
Industrial Oddity
Weird Beast
Metamorphosis
The Future


I chose strange beauty, the reason for this is simple, I feel that I have more room to manoeuvre in this title, I also feel that it will suit the model I have chosen, as she is tall, has beautiful eyes and a soft face, I am able to change her appearance dramatically, but I feel that utilising what I can from her, will give me a better finished result as it will flow.  

    The next stages are as follows:
 
1.           The cast
2.           The Making of the Mould
3.           The sculpt
4.           The making of the prosthetic pieces
5.           Application
 
    Not forgetting prior to all this The Design

Tuesday, 28 October 2014

Face Casting.

HELLO! I realised that I had written this but not publised it! so for those who noticed it was missing here it is, sorry!

In order to create a prosthetic appliance a cast needs to be made of area on which you wish to work on.

The following steps are how I did this.

You will need the following


  1. Bald cap/ swim cap
  2. Fast set Alginate
  3. Mod Rock Bandage
  4. Plaster of Paris
  5. Protective clothing for the model and yourself
  6. Vaseline
  7. 2 bowls ( alginate and mod rock and then re use for plaster.)
  8. A partner to work with. 


Cover your models hair with either the swim cap or bald cap, 
coat his/her brows, lashes or any remaining bits of hair anywhere with Vaseline to stop it sticking to the alginate.

once mixed, the alginate sets in 3 minutes, work quickly, 
ensure you read the manufacturers instructions as this may differ, ensure you use cold water or it will immediately set. 

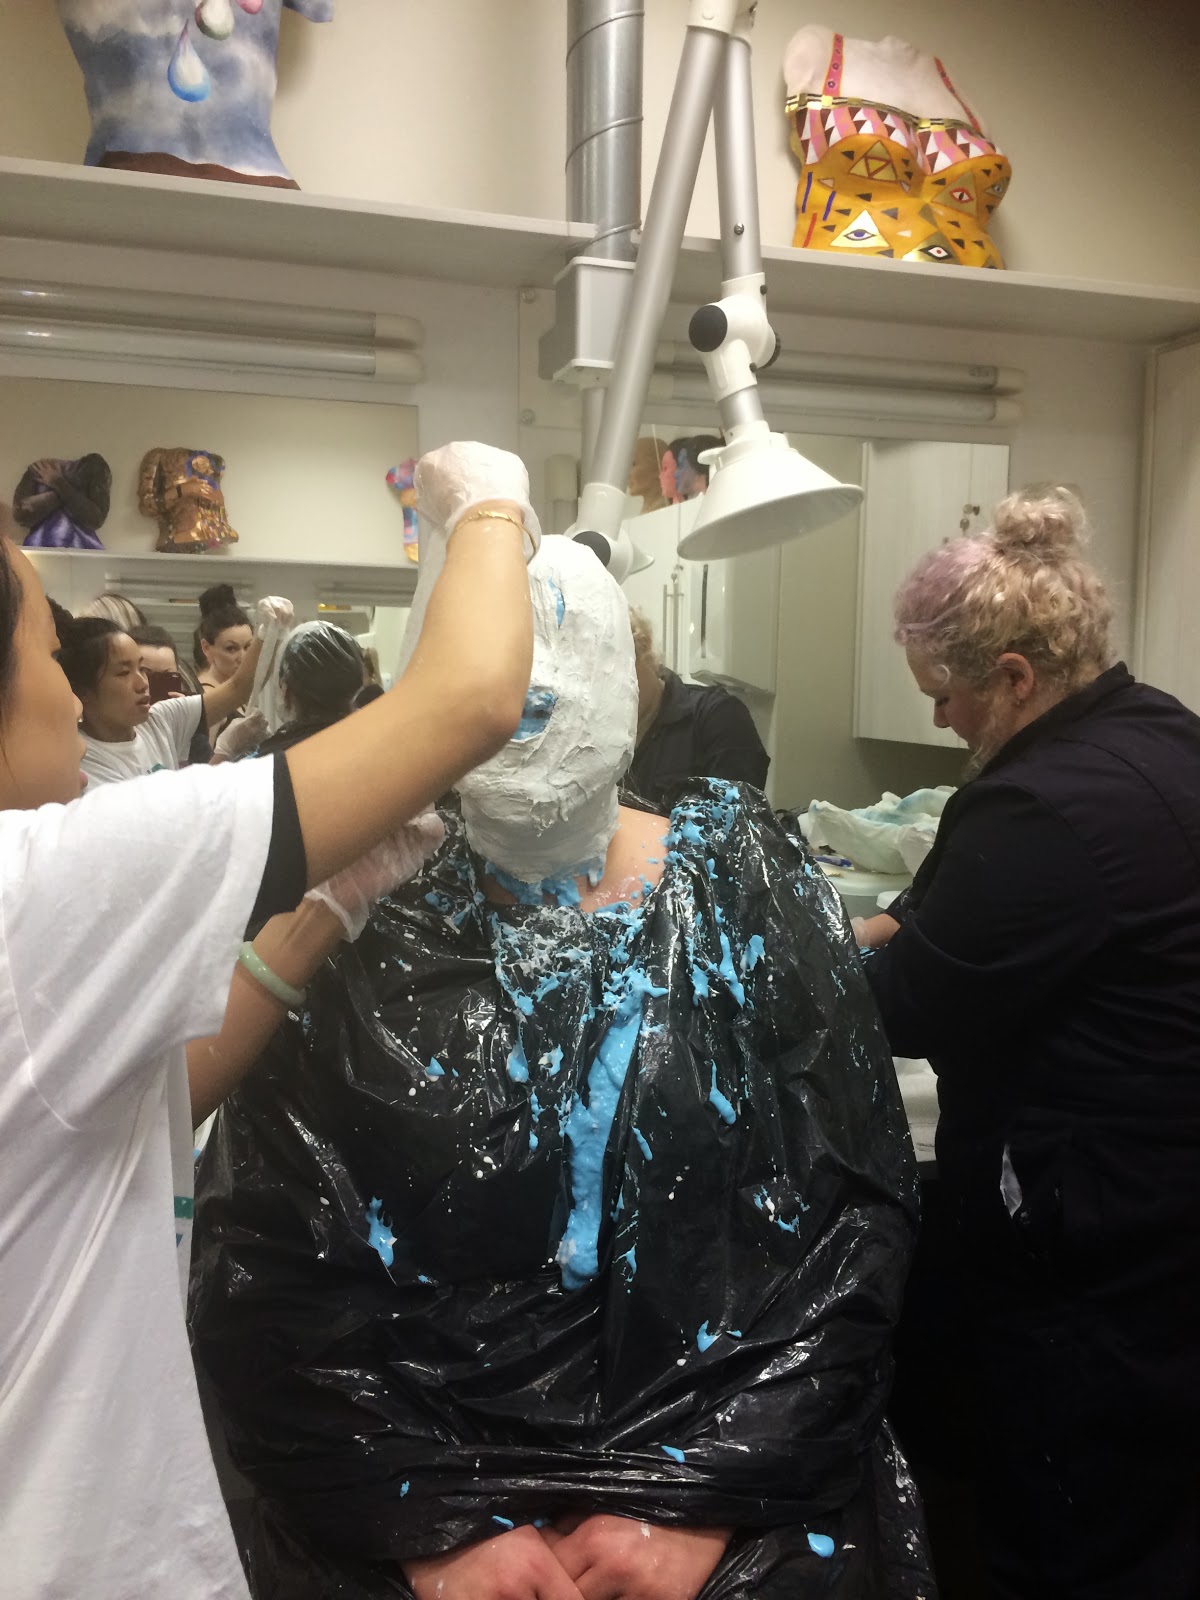
as you can see I am working with a second person to ensure that my models airways are kept clear and it is a quick process. 

 once the alginate is covering all the area you need it to be applied to, begin applying the bandage, once again work with a partner, so whilst one is applying the other is checking all is OK with the model and the bandage is cut and prepared.

 ensure you work from the outside in, make sure at all times your model is happy, go over the nasal area ( ensure you never go over the nose holes) by this i mean the bridge, last.


 allow to set for around 10 min. then ask the model to suck their cheeks in and move their features about this will unlock the cast from the face, then you and your assistant carefully remove the cast by getting your model to tip slightly forward. 


 prior to this last stage I filled the nose holes in with some alginate, 
then began filling it with plaster, ensure you coat it in areas of fine detail to capture this, it is worth mentioning that you do this with the alginate over the eyes and mouth, to capture detail. 
 to remove the alginate from the cast you carefully peel and it should come away with ease, there will however be areas where alginare needs picking out with sculpting tools. 

 Here I am removing the alginare that had embedded itself, with a sculpt tool

READY TO BE SCULPTED ON!

The Design

My design is based around the title "Strange Beauty" I chose this as I think it conjures up lots of beautiful imagery in my mind, it also lets me go a little crazy.

My Work is heavily inspired by the likes of Michael Westmore (Star Trek) and Arjun Tuinten (Pans Labyrinth). Art such as Dante-Gabrielle Rosetti (Pre-Raphaelite artist) Echo Chernik (Art Nouveau).  There is a large nautical element as I live by the sea, which is my inspiration.

I decided I would go for a more sea like creation as, the sea is very alien and mysterious as well as the fact that I am able to source things such as, shells, nets and other maritime and nautical items. The local museum has items within that are inspirational as well as the sea life centre.

Not only will I focus on the face, but I am going to put an entire look together, incorporating the hair, nails, skin and clothing, my intention is to recycle almost everything from local fishermen and the sea.

I am going to add pictures to this post once I have scanned them.

Cardassian Vole- Designed by Michael Westmore. 


 [Westmore MichaelNotes from DS9. Available: http://rindastartrekds9.wordpress.com/2012/11/19/ds9-storiesnews-michael-westmores-aliens-2/. Last accessed 05/03/2014]


Make-up by David Marti and Arjen Tuiten


[Leininger, R. (27.07.2009). Top Ten Make-Up's in Film History.Available: http://www.celluloidering.com/top-ten-make-ups-in-film-history/. Last accessed 05/03/2014].


Dante Gabrielle Rossetti, Proserpine 1847


[Riggs, T. (1998). Dante Gabrielle Rossetti. Available: http://www.tate.org.uk/art/artists/dante-gabriel-rossetti-461. Last accessed 05/03/2014].


Artist:Echo Chernik.

[Logan Faerber. (2014). The Art of Animation. Available: http://theartofanimation.tumblr.com/. Last accessed 05/03/2014].


here are images of my own design. 
This is my own design, as you can see the face will be squid/octopus like, the main part of the face can be sculpted as one part, I will then sculpt the tentacles as a separate prosthetic piece, slotting them all together finally. 


This shows the extravagance of what I would like the finished design to look like. 
I would also like to try and build a crown, I need to decide on a material to build it from.
I am going to make the hair huge and hopefully give it a tangled, matted mess look, with various sea creatures within it, if it is possible, I would like to source all creatures, shells and nets from the Scarborough/Whitby Coastline.
I didn't leave the pencil there to show my artistic intent, its just there! ha ha! 

To follow the rest of the process - move on to the next post, 'Let the cast begin' I do hope your enjoying the process, if you have any questions about any part please feel free to ask! 


Monday, 27 October 2014

Clay, Silicone and Jesmonite

This is now the next stage of the process!

Yes! There Are More Stages!!

We now need take the original cast, which is uneven to say the least on its underside, using clay, even it out so it is level.

This is for when we pour silicone on to the cast to create the 'negative' mould from the 'positive' the positive is the 3D face shape, so the hollow silicone is a negative.

Images below explain the process better than I can,  just by writing it.


here you can see that I am in the process of stabilising the base, filling in the gaps and creating a smooth line and lip at the base. 

 here again I am creating the base, you can see that I have built a wall around the cast, this is to stop any silicone from running off. 


I think she looks like a sleeping nun, someone out of Star wars or Hell-razor 
feel free to think of many more! 


 Here you can see the moat like outer edge, the holes on the base are known as keys, they allow the 2 pieces to fit well together as well as separate, they are made with a dull rounded object and don't need to be too deep, I used the round end of a pipet (the bit you squeeze).

 The next stage is the silicone stage, for this you need some new materials; 
 1. A pot
2. Spatulas
3. Latex gloves (or others if allergic)
4. Tinsil gel 10 (part B)
5. catalyst 100b (Part A, 10 parts)
6.scales
7. Mould release Spray. 
The mix is 300g to 30. 
The reason its red is because we coloured the mixture to see that it is completely mixed
as it somewhat see through/opaque.
Begin pouring the 1st layer of silicone from a height to avoid air bubbles. 


Once it is all on, work round the eyes and mouth, nose to get detail again as at the end of all of this will be the face you will be sculpting on to.

Allow 45 min to set at least.


This here is the 2nd layer, once you let the 1st one set, its round 2!
Same process, we coloured it slightly lighter so we could see the layers!. 


Again 45 min - 1hr wait and beneath is the result.


Jesmonite!
So we ran out of plaster of paris, well almost, so we mixed Jesmonite and plaster (perfectly fine and safe!)
This stage is the jacket, this covers the silicon and gives it a sturdy jacket so you are able to pour in the plaster or Jesmonite (in my case a hybrid!) 

Because the jacket is made up of Jesmonite (mixed in the same way as plaster of paris, with water to the consistency of double cream).

I am using matting rather than burlap, the Jesmonite is made up of acrylic chemicals and the matting is plastic based so they work together to create strength.


At this point we decided to just put the Jesmonite on the silicone mould with our hands (with gloves on, though its not dangerous to the skin) as this was quicker and it began to set. 

Action shot!


After we encased and allowed to set, we repeated the original process this time with Jesmonite and created a new cast and below is the picture of the cast!


NOW SCULPTING CAN BEGIN!
EXCITING!!!
LOOK OUT FOR MY NEXT POST ENTITLED
'THE SCULPT'

Sunday, 26 October 2014

The Sculpt

With all prosthetic pieces and designs there is the creative realisation and implementation of making your design in to a 3D sculpt.

In order to accomplish this you will need a set of sculpting tools, I will post images of the set that I bought for around £10-15 from E-Bay, they are fantastic. This will be in a separate entry, with a list of all resources.

So then, My design was almost an octopus woman, I did earlier sketches so that I was able to work with the idea, I also sculpted tentacles as a separate prosthetic, these will be cast in a completely different way, I am yet to do this, but rest assured as soon as it is done, the process will be posted.

Beneath are the various stages of my sculpt, the various tools I used as well as the fact that I got carried away and needed to re-do it!

I used a plasticine based clay to sculpt with, this is durable and tends to not dry out, where as traditional sculpting clay will dry out as it is water based.

To make the plasticine based clay to be more pliable place it in an oven on around 20-40 degrees for about 10 mins, this softens it enabling you to work at ease.

This is the cast 

1

applying the clay to the contours that I wanted to accentuate, I then built it up with small amounts of clay, repeating the same process, at this point, it isn't the detail you are after, it's building up layers, smoothness is not an issue here. 


2

Here you can see that i have brought the clay over the lip, generally when a prosthetic is cast, to get a good seam (lines that the prosthetic end on) around the mouth it is either facing in to the lip and mouth or above it, this gives better movement once applied to the models face. 


34


5

Side profile , the gaps near to the eyes are where I plan to place some of the tentacles. 


6

Here we can see that I have begun to add detail, I was way ahead of myself, this was all erased.
Detail is the last thing you add, I will speak about this further in the next stage explaining why.

7

8


910


Tentacles 

12


3

4

I made the tentacles by using the same clay, I rolled the clay in to 1" thick and 4" long then began to use my tools to straighten the edges and create the V shape inner line. 
For the suckers, i rolled out half little circular pieces of clay, around half the size of a 5p and used the end of a took the give the indentation. 


My helpful dad holding the design up, just to give you an idea!
I have to say that it resembles Yoda with a red ear! 

The next stage to follow is the one where all this detail is completely changed!